Product: SnapIT, A screen capturing tool for Windows.
SnapIt, an innovative name and an equally useful software. This review is based on my 7 day experience in using SnapIt, during which time I was quite happy with the user friendliness and usefullness of this software.
How many times do you press the print screen button, for creating images to be inserted into a report?
If the answer is zero,then this product is not for you.
If the answer is not zero, then definitely try this software.
Normally, after every screen capture, we have to open an imaging software, paste whatever we have copied to clipboard, save it as a file in a folder so that we can use this file later.
In some cases while preparing user manual kind of a document, we have to keep on taking screen shots. After each screen shots are taken, we spend a good amout of time in making it a JPG file using an imaging software. This time can be saved a lot by using this software.
Things I liked in SnapIt
Things I liked in SnapIt
- After screen capture using normal printscreen, I can select the area of screen which needs to be copied. Specify the file name and save it without the help of an imaging software
- Auto save mode for saving multiple screen captures. In this mode I have to specify the folder where images are to be saved. Also specify a filename. Once in automode, after every Print Screen and area selection the file will be saved in the specified folder with the file name previously specified combined with a count.
Anyone can try this for free since this has a 14 day trial period during which time we can decided whether we need it or not.
How to download and install?
1. Go to http://www.digeus.com/downloads/snapit/index.html
2. Click Download. Save the install file (1.2MB) to your PC.

3. Double click the installation file and follow the instructions.
4. Once installed run the SnapIt program. This camera like icon will appear in the system Tray.

5. Press Print screen button. The mouse icon changes to a select mode. Select an area for saving.
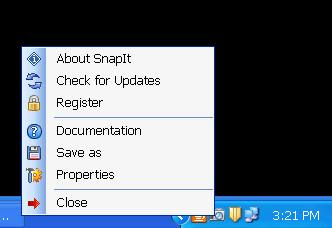
6. Right click the SnapIt icon. A pop up window appears
 7. Click save as, Select folder and file name.
Thatz it, the image is saved.
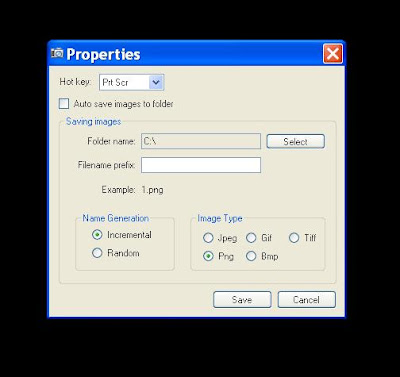
For enabling Auto save Click "Properties" from the Popup menu specified in Step 6.
This window will appear

Select auto save and specify the folder and file name.
Once this option is enabled, just keep on pressing print screen and select the area to be saved. The image will be automatically saved.
Sure to save loads of time for the User manual creators, for creating screen shots for presentations etc. All the screen shots of this write up has been created by SnapIt.
If you feel this product is useful, you can purchase it by clicking the "Register" option from the Pop up menu. This screen will appear.

Click Order now and it will lead to the product website. Cost of this software is $17, which is only a low price to pay for the loads of time you save.
An UNCOMPLICATED product with a very simple User Interface. Really worth a try.


No comments:
Post a Comment