Friday, January 15, 2010

Handle bar for Royal Enfield Bullet


Most of the passionate Royal Enfield owners will have faced the dilemma of chosing the proper handle bar for their ride.

Some makes there selection based on aesthetic appeal and some selects it from a usability point of view. My take is to give priority to the usability part without losing out on the aesthetic appeal. The experience gained by me in chosing my bull's handle bar is shared here


The bullet which I bought came with a short handle bar, which has a touch of classic feel associated with it.


I just loved the majestic appeal which it gave to the Royal ride.

The seats were of the low slung type for the rider and slightly raised one for the pillion


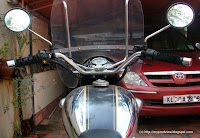
A close up view of the handle.


and the seats


After one month of usage in this mode, I felt some uneasiness in the wrist after some long rides. But I felt this might be the initial syndromes. After six months or so I started developing severe pain on my right elbow, for which I have to consult a doctor, who rightly advised me to find the activity, which when done is causing maximum pain. I soon found out that it is while twisting the accelarator, I am feeling this. This pain was aggravate after my solo ride to Idukki (Click here to read the trip log). My wrist was bandaged and it was diagnosed as tennis elbow and the doctor advised me not to activity which aggravates this. I was horrified to hear this as I could live without my bull.

After a careful analyis of different elbow positions while twisting the accelarator, I found out the following

1. When the hand is dead straight, the twisting action of wrist is sure to exert the elbow muscles. I was feeling pain, when I kept the hand straight and tried to twist the elbow

2. When the elbow is bend, the twisting action is not straining the elbow. I noticed that the low slung seat, resulted in a relaxed riding position and we tend to either sit straight or lean backwards, which eventually increased the distance to the handle. So we have to keep our hands dead straight for giving the throttle.

So now I had two options

1. To change the seat to a flatter one. This will increase the height of the rider's seat. In this seat, people often tend to lean forward, so that the elbow will have a slight bend. But the higher seat means, the Centre of Gravity will also be high and high speed cornering is sure to take a hit. I don't want to lose out on the sitting comfort offered by the low slung seat during my long rides through those beautiful ghats where I enjoying scratching the footpedal on floor.

2. To increase the height of the handle bar. This will bring the handle bar closer to our body and hence we our elbow will be bend. For high rise handle bar there are a lot of options.

1. The bullet electra handle bar
2. The RD 350 handle bar
3. The bullet thunderbird handle bar
4. The aftermarked buttlefly handle bar which resembles a thunderbird handle, but is slightly wider.

I decided to try out any one of these and then if found not good will select the next one.

The first one, I got hold of was the RD handle bar, which was slightly wider than the standard bullet electra handle bar.

Fitted this on my bull. Just see the difference in height between the two bars


Even with the bandaged hand, when I rode with this handle bar, I was not feeling any pain at all. I was releived and decided to keep this handle for my next long ride.

This was closer to me as well.


The low slung seat and the high rise handle


After the next ride (Click here to read about this ride) which covered about 500km a day, I was extremely convinced about this handle and I did not test the other high rise handle bars.
But during this ride I noticed that there is excessive vibrations on the handle bar, which was not there with the short one. This vibrations start once I take of my one hand from the handle. The moment I keep my hand it will die down.

Then I understood the importance of handle bar weights which is normally screwed to the ends of the handle. The original short one had handle bar weights. In this handle I had put a handle bar grip with a chrome cup at the end. Soon I put the original handle bar weights to the ends of the handle and voila the difference was amazing.
I am wondering about the worth of small and simple things in solving real world problems. What I thought of was having a mere cosmetic item was having such an importance was not known to me.


The weights were screwed in after welding a nut inside the hole of the handle bar.


The things I learnt are
1. Low slung seats needs high rise handle bar
2. High RD handle bar is adequate because of it height and also due to its increase width and lean towards the rider.
3. Handle bar weights is a must

I did many long rides and never did the pain in elbow came again. You can read about my rides here (http://subups.blogspot.com)

Monday, January 4, 2010

Interlocking Bricks - Save your construction cost

Product: Interlocking Bricks (update in 2013 posted at the end of this write up)

Interlocking bricks - as the name suggests locks itself with other bricks and it is these interlocks which give strength to the wall. No cement mixture is needed for the bonding.

This is a concept which many people of my State (Kerala) is not well aware of. People often tend to reject anything which is new. Same was the case with Interlocking bricks, as was evident by the response of people whom I approached to get expert opinion on the usage of these bricks.

It was my architect who introduced this concept to me. After visiting two or three houses built by the architect using these bricks, I decided that I was going to use this for construction.
 

The major difference with the normal bricks used for construction and the interlocking bricks are

  1. Interlocking bricks are not baked, it is just mud in high density pressed using a pressing machine and allowed to solidify by drying naturally. Some chemicals are added for increasing the bondstrength. Normal bricks are baked ones
  2. Size of interlocking brick is more. Approximately it is 2.5 times more in volume than the baked bricks. (size is 10" x 8" x 4")
  3. Weight of Interlocking bricks is more than equivalent volume of baked bricks.
Method of Construction using interlocking bricks

1. Normal basement is to be laid down first. Since the interlocking bricks have more weight than conventional bricks, a more stronger basement is needed.

2. Once basement is laid, one layer of normal baked bricks is placed over the basement. Width of this layer shall match with the thickness of the wall which is going to be built using interlocking bricks.

Quick fact: the windows you see in the above picture are concrete frames. to know the pros and cons Click here to learn my experience.

3. The Interlocking bricks are neatly arranged over this layer. (Experienced labourers are a must, since any irregularities in their placement cannot be corrected at a later stage.

4. While concreting the roof, ensure that the edges of the roof projects out a little more than the wall. This is to ensure that rain water do not flow through the walls.

5. Once the construction is complete the corners of the wall are completely plastered using the cement. This helps to have adequate pressure from the sides of the building for the bricks bonded together. The pressure from the top is from the concrete above. So it is as if the interlocking is placed with adequate pressure from all the four boundaries.

Before plastering the edges


after plastering the edges


A close up view of the plastered edges


6. The external wall can be left as such without painting. But the gaps have to be filled with like colored cement.


If painting need to be done, it can be done directly over this wall. (I chose not to paint)

7. If internal wall need to be plastered, it is better to make the surface rough before plastering, since the surface of this brick is relatively smooth.


Advantages of Interlocking bricks

1. Cost saving in terms of cement, sand and water.

2. Design is more blended with nature as arificial bonding mechanism is completely done away with

3. The walls have more strength than the normal walls. (just hit the wall and listen to the sound of walls made by interlocking bricks as well as by normal bricks)

4. These bricks does not heat up as fast as normal bricks, hence the room will remain cooler.

5. Since no painting is required another cost saving


Disadvantage of Interlocking Bricks

1. The space between the interlocks of these bricks is enough for insects and ants to set up there homes. (To avoid this point the gaps using cement mixed with redoxide and do periodic mainteance once in 6 years)

2. If rain water flows through these bricks, the color of the brick changes very fast.

3. It is difficult to ensure availability of the same coloured bricks for the entire construction. If painting is not planned, all the bricks should be having the same color. For this all these bricks have to made from the soil of the same place.

4. Not suitable for buildings having more than 2 floors, if it is not supported by pillars. Pillars are not needed for double storeyed buildings.

Cost of one brick is approximately Rs. 12/- (In 2004)
Purchased from Sal Interlocks Thumba

Update on Nov 2010:
Sal interlock is closed now
Two more units are there in Thiruvananthapuram. One is near Puliyarakonam and other one is in MC Road near Venjarammood.

Update on Oct 2013
Current cost of brick is Rs. 28 (add Rs 3 for unloading too)
Initially when I constructed my house using interlocking bricks, I had plans to plaster and paint the exterior, after 5 years. Now 8 years completed. Still the exterior having fresh looks that I need not think of plastering or painting. Thanks to my architect who suggested to leave the exterior without polishing, and to the design which ensured that water doesn't flow through the walls during rains, it is still holding up good.  The plastered interior is due for a repaint now though.

Recently I fixed up some more cupboards (read showcase) using PVC and aluminium. The fixing of these by screwing was also not a problem. The brick doesn't break up. You can read about the low cost solution for wardrobe and kitchen cabinets by clicking here.


If you want to have more information on these bricks please post your question as comments or email me.

My architect was Mr.G Sankar of Habitat Group.

To read my experience of entire house construction , click here

Why don't you have a look at my Travel blog tooo? You can find exclusive coverage of exotic locations in and around Kerala - God's own country. Click here to view my travel blog

Related Posts Plugin for WordPress, Blogger...