Thursday, October 29, 2009

Side box/s for Royal Enfield Bullet

Product: Sideboxes for Royal enfield bullet
Make: Custom
Material: MS (Mild Steel) with chrome coating


Would you believe that I searched for this one accessory for about 1 year and after that took another 7 to 8 months to realise this.

My requirement for sideboxes (Panniers) were
  1. Want to keep the daily luggage (tiffin box + one bottle), rain coat, tools + some grocery
  2. Needed it on both sides, just for that symmetrical look
  3. It should look part of the original equipment and not an add on accessory
  4. Should not protrude too much away from the body of the vehicle
  5. Ladies wearing sarees should be able to sit with both legs in one side even after fitting this box.
  6. The pillion riders thighs should not rest in this sidebox, coz this will start to cause pain in thighs after about 5 mins ride
  7. It should not hinder my leg's travel path while getting in or out of the bull

I searched the net, checked with local accessory shop, and wherever possible to find one meeting the above criteria. There were some beautiful ones from Studds. Was tempted to buy that. But once fitted, it will not satisfy requirement 4, 5, 6 and 7.

Had almost dropped the idea, when a friend of mine suggested to try for a custom build and introduced me to a guy who had already done such jobs. He immediately enlightened me with the reasons for ready made ones not meeting my criteria.


The "Stay rod" (see above figure) which supports the rear mudguard is curved outwards. So the side box can be fitted only outside this stay rod, resulting in it protruding too much away from the body.

Solution - bent the stay rod inwards.

Even after this, the gas shocks (shown in figure) will come in way of the box.

Solution - Bent the inside of the box to accomodate the gas shocks.

I was impressed with the way he explained the things and the card board model which he cut and showed me. So placed a work order immediately.

After that started my long ordeal. This guy had lot of commitments including alterations amounting to lakhs of rupees, which made my rather low value order being put to the back stage. Finally after much follow up, the box was ready after 8 months.


Now see the output of this effort.

The right side box
Since part of the box goes underneath the back seat, the opening was made side on. The doors were made bigger, just to ensure that there is ample opening for things to go in.

The left side box
The saree guard on the left side was removed. Now this box itself serves as a saree guard. I bought another pair of stay rod and kept the original as spare, in case I want to go back to the original state.

The view from the back. One will not notice that there is a box unless he is quite watchfull.

The doors were plated just to match the chrome of the tank. The shape of the door also had a resemblance with the petrol tank's shape. These minute details ensured that all the requirements specified by me was met.


Does this look aftermarket?


Total cost: Rs. 4000 (INR) approx for two boxes

In use for the last 18 months, Went for some long distance trips too, only one back pack was needed in

additional to the space offered by these two boxes. Click here to view pics / log of one of such trips here

Let me know whether this review was useful to you by way of comments
Friday, October 16, 2009

SnapIt - An easy to use Screen Capture Software

Product: SnapIT, A screen capturing tool for Windows.

SnapIt, an innovative name and an equally useful software. This review is based on my 7 day experience in using SnapIt, during which time I was quite happy with the user friendliness and usefullness of this software.

How many times do you press the print screen button, for creating images to be inserted into a report?
If the answer is zero,then this product is not for you.
If the answer is not zero, then definitely try this software.

Normally, after every screen capture, we have to open an imaging software, paste whatever we have copied to clipboard, save it as a file in a folder so that we can use this file later.
In some cases while preparing user manual kind of a document, we have to keep on taking screen shots. After each screen shots are taken, we spend a good amout of time in making it a JPG file using an imaging software. This time can be saved a lot by using this software.

Things I liked in SnapIt
  • After screen capture using normal printscreen, I can select the area of screen which needs to be copied. Specify the file name and save it without the help of an imaging software
  • Auto save mode for saving multiple screen captures. In this mode I have to specify the folder where images are to be saved. Also specify a filename. Once in automode, after every Print Screen and area selection the file will be saved in the specified folder with the file name previously specified combined with a count.

Anyone can try this for free since this has a 14 day trial period during which time we can decided whether we need it or not.

How to download and install?

1. Go to http://www.digeus.com/downloads/snapit/index.html

2. Click Download. Save the install file (1.2MB) to your PC.


3. Double click the installation file and follow the instructions.

4. Once installed run the SnapIt program. This camera like icon will appear in the system Tray.

5. Press Print screen button. The mouse icon changes to a select mode. Select an area for saving.

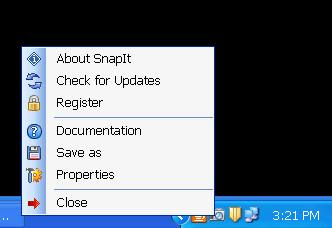
6. Right click the SnapIt icon. A pop up window appears
7. Click save as, Select folder and file name.

Thatz it, the image is saved.

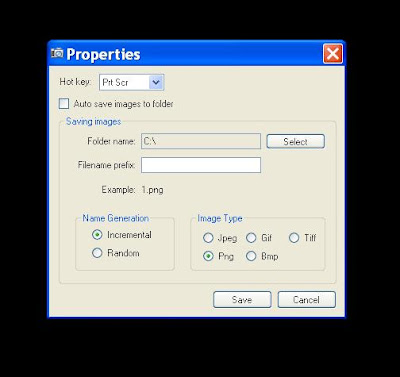
For enabling Auto save Click "Properties" from the Popup menu specified in Step 6.

This window will appear

Select auto save and specify the folder and file name.

Once this option is enabled, just keep on pressing print screen and select the area to be saved. The image will be automatically saved.

Sure to save loads of time for the User manual creators, for creating screen shots for presentations etc. All the screen shots of this write up has been created by SnapIt.

If you feel this product is useful, you can purchase it by clicking the "Register" option from the Pop up menu. This screen will appear.

Click Order now and it will lead to the product website. Cost of this software is $17, which is only a low price to pay for the loads of time you save.

An UNCOMPLICATED product with a very simple User Interface. Really worth a try.

Monday, October 12, 2009

Goldstar Silencer for Royal Enfield Bullet

Product: Goldie aka Goldstar Silencer for Royal Enfield Bullet.

A thumping solution for the poor souls who miss the thump!!

The AVL's or the aluminium engine bullets has quenched the thirst of lot of bullet crazy boys. Many first timers of Royal enfield enthusiasts prefer to go for this model because of the normal positioning of the gear/ brake lever, its reliability and higher cruising speed. But the price they have to pay is the lack of thump which only a traditional bullet having cast iron core gives.
I too was someone who was worried about this. But then my friends in the riding club offered a solution.
A GOLDSTAR silencer. (The name of which is derived from the old timer BSA Goldstar)

My machismo had come with a long bottle silencer as shown in this picture.


To satisfy some emission norms there are some barriers inside this long bottle silencer which will let the air out in a zig zag manner only, resulting in dampened sound, due to which the engine noise is more audible than the regular thump of the bullet.


The goldstar silencer or the Goldie does not have any baffles inside it and the unique shape of the silencer ensures adequate back pressure and once fitted the difference is really amazing.
There is no need to replace the bent pipe.

My bull with the Goldie.


Once Goldie is fitted the changes I experienced are

  • Feeling of a sense of freedom
  • I'm revving up further automatically & I'm feeling more power
  • The thump definitely has gone up. If driven sedately then sound is very less.
  • The most significant note which I liked was the thump while revving up from a constant speed
  • Earlier while driving I felt that the engine is tooo light. That feeling is now gone away.....

GOLDIE REALLY ROCKSS......!!!

Purchase price: 2K

Place: Bangalore


Note: With Goldie one could get a sound like thump, only a standard bullet can give out the thumping sound


Saturday, October 10, 2009

Toy Guitar - Quite realistic !!

Product Name: Guitar
Age group: 04 and up

Just one look at this beautiful product and you are sure to fall in love with this one.


Color combination of the toy is something which is an important ingredient to make the toy attractive and this one is sure to attract kids if not the so called adults.
The sound output matches with that of the guitar so much so that at times it feels as if someone is playing the real one.


The four buttons on the handle is used to play the sound.


The round lever on the main body can be used to give special effects to the sound. Just watch the right hand of my son.

The four switches in the main body is for switching on and off and to give select the background tones. There are volume control buttons on the main body.


Any kid will easily get accustomed to its usage.

The good thing is that when a kid plays this, the sound of music coming out is enjoyable to people around, otherwise it will be a nuisance for others when a kid plays this. The kids also enjoys the music, making them use this again and again.

This toy works on battery with auto power cut off when not in use. There are no sharp edges and is built to tolerate abuse to a certain level.

Related Posts Plugin for WordPress, Blogger...