Thursday, December 17, 2009

Windshield for Royal Enfield Bullet

Product: Windshield
Make: Royal Enfield
Purchased on: Jan 2007
Overal rating: Excellent

The need:
1. When driving at good speeds near paddy fields at dawn or at dusk, lot of small flies comes and hit against the shirt, killing itself and spraying blood stains all over the dress
2. At times my little one just want to sit in front of me, and I want to protect him against these flies and dust
3. I liked its looks

The study:
The study based on net search and discussion with friends on pros and cons of fitting this yielded the following results,
1. It will create drag because of higher resistance, but there was no concrete evidence to prove this theory
2. Visibility will be very less especially when helmet is worn
3. It is very costly
4. In the event of a fall this can be dangerous


The decision:
Sometimes, even if you hear so many cons, you just decide based on your instincts and in this case also my instincts made me buy it

The purchase process:
The local dealer in my town told that it will take atleast 1 month to source it and quoted a price of 5.6k INR, which was a good 1.5K higher than one of my friends whom I have contacted had bought it, one year ago. I searched in other cities too and luckily found out one dealer who had one in their godown and offered me at the previous price. Within no time, I purchased it with the help of one of my friends in that place

The fitting
I decided to ride down to the place where this was bought which is a good 250 Kms away from my place (another reason to ride).
The packing was quite excellent, since it was a small package than I had in my mind.
On opening the following components were present

Nuts: 15 numbers
Short clamp: 2 numbers
Long clamp: 2 numbers
Small pipe like clamp: 1 number
Windshield : 2 parts

The fitment with the markings are as shown below.


1 & 2: Nuts to fix the short clamp to the headlight assembly. Only in Machismo there is provision for this nut to be mounted on the headlight assembly. In other models of bullets, one need to drill a hole.

3, 4, 5 & 6: Nuts to fix the lower part of windshield to the headlight clamps

7, 8, 9, 10 & 11: Lock nuts to join the lower part of the windshield with the upper part. Note that, since these are lock nuts, they won't tighten too much against the windshield. If you use any other nut instead of these original lock nuts, chances are there for cracks to appear, since those nuts tighten themselves against the windshield body.

12 & 13: Nuts to fix the upper part of the windshield with the long clamp which acts a support for this long windshield. The long clamp is to be fixed to the handle before this is done.


14 & 15: Nuts to fix the long clamp to the handle

16: Pipe like clamp which is to be fitted in the handle. The long clamp goes inside this pipe, which is tightened using nuts 14 and 15

17 & 18: The short clamp, which is fitted in the headlight assembly using nuts 1 & 2


19 & 20: The long clamp, which is fitted to the handle using the pipe clamp and which acts as support to the upper part of the windshield
21 & 22: Windshield lower part and upper part.

This is just a do it yourself fitment, but if you don't have all the tools then better do it at an authorised service centre.
Another thing to ensure when the package is opened is to check whether all the nuts are present. In my case it was not there and the installer tried to put normal nuts instead of lock nuts. Luckily this was found out and when the matter was reported to Royal enfield by their website feedback form, I got a prompt response and replacement was done within 2 weeks. EXCELLENT CUSTOMER SUPPORT isn't it?


Pros and cons I experienced with Windshield on

Pros
1. It really adds to the looks. A favourite with kids, coz you can always see them pointing towards you. Windshield is best avoided, if you don't want to be the centre of attention.

2. Fatigue levels are lesser after long rides because the hard hitting of air onto your chest is missing and this is one of the reasons for fatigue

3. You can ride even without your jacket on through the crowded and dusty city traffic and still emerge with a neat shirt.

4. The flies and other insects are clearly blocked

5. The drag is less, since the resistance offered by the slightly slanting, glassy surface is less than the resistance offered by the body. (My top speeds not decreased after fitting this one. Tested this before and after the fitment)

6. During heavy rains, water don't lash hard against your body. It will not completely block the water, but just helps to reduce its severity and your rain jacket is happy at the lesser work it has to do, to keep your body dry

Cons
1. Driving at night, when it drizzles is a pain. The lights of oncoming traffic will be brighten up this windshield and you will not be able to see anything in front through the windshield. If your height is more than 175cms you will be able to see through the top.

2. Maintaining it clean and scratch free is a pain.

Now time to see for yourself, one of the snaps of my bull with windshield


Feel free to ask me any questions in this regard, by commenting on this post.

If you are interested in reading my experiences of long rides in a bullet, please visit here http://subups.blogspot.com

To know about other not so common accessories click on the following links
1. Custom made dual sideboxes - a practical as well as aesthetic solution
2. Goldstar silencer

Tuesday, December 15, 2009

Exterior Tiles - Sirex Interlocking Tiles - Built to last

Product: Sirex Exterior Tiles

Do you like to have these kind of exteriors to your house?


If you are planning to lay exterior tiles and is in the process of choosing one, read on my experiences in selecting and laying of exterior tiles.

When it comes to exterior tiles two types are available.

1. One which is laid on a hard top, ie after laying a layer of cement mixture. The tiles are also bonded with the help of cement mixture. Water will not go through these tiles to the ground.

2. Interlocking type, which is laid on top of a layer of sand. No cement mixture is needed. The tiles are tightly packed and their interlocking nature helps it to tightly bond to each other. Water can easily go through this to the ground.

I opted for the second type, due to following reasons
  • The rain water gets absorbed in the ground, which is the way it should be
  • If at all some maintenance is needed for some pipe line which goes underneath these tiles, it can be taken out and then put back without the need for breaking a concrete floor.
  • This breed of tiles seems to have the best grip, even during rains
After a bit of local enquiry on exterior tiles, I shortlisted Johnson and Sirex tiles, of which I felt Sirex is more ruggedly built and cost effective too. Also I happened to see one house where this tiles were laid. Chose a color matching the exterior of my house. According to me, the tiles should not steal the limelight once it is laid. It should be neat and colorful but should only aid to the ambience and play complement the exterior of the house.

Once I gave contract to one of the leading retailers in my town, I get a message from him that Sirex has stopped production and he will instead give me Johnson. I was not happy to hear this, googled and found out a website of Sirex. Was surprised to know that this brand is made in Kerala. Sent an email to the contact person mentioned there. Surprisingly I got a reply within some 1 hour and then a marketing executive contacted and soon the retailer called me and promised the deliver as soon as possible. It was one unexpected customer service from a brand which I thought would not have any such support.

The retailer himself arranged for the work contract also. The work details are like this.

1. First a layer of sea sand was spread
2. Using a mechanised leveller the sand was levelled. This levelling and packing of sand is very critical for the uniformity of the tiles.
3. A small chemical treatment was done to prevent the attack of ants and other pests
4. The tiles were then laid ensuring that it is packed tightly so as to avoid any lateral movement.
5. The leveler was used again to level the tiles.

An area of about 400 sq ft was completed in a days work.

The rate of work was at Rs 50 per square feet, including labour and excluding sand. Once finished the look of the house itself changed.

Just see for yourself


It has been 3 years since I laid this one, and even now after a small cleaning using water, it looks brand new.

These are the words from a truly satisfied Sirex customer.

Tuesday, December 1, 2009

Sreesanth - A review of this turbulent Kerala Speedster

Sreesanth -
Is it a product to be reviewed?
How can a human being be a product?

Basic purpose of cricket match is to entertain the viewers, I am seeing each match as a product just like a movie and hence its characters also can be termed as products.

Any how this speedsters performance in his comeback test against Sri Lanka on a dead pitch deserves a review, for it truly pumped up the spirits of many cricket enthusiasts of India.


I have been watching this guy with utmost enthusiasm ever since he started making headlines in local newspapers and each of his actions or his families actions were traced with much vigour by the media. In him I saw a real life representation of the dreams which I cherished from my childhood of playing cricket along with national team, a kind of brotherhood since he belonged to my state, a kind of sympathy since I felt he will fade out soon amongst the bigwigs of the cricketing fraternity and above all the vigour with which he bowls.

Within no time success came in his stride, because of his bowling skills, but somehow his antics on the field was getting out of hand and soon even people of his home state started to curse him. But even when he was showing all his antics, I never felt real bad, because he was doing what he was supposed to do wonderfully well and when he danced midpitch after hitting an Andre Nel delivery for six, tears were rolling from my eyes, because I too was terribly disappointed when Andre Nel was abusing him after bowling a bouncer and hurling abuses at him. I don't think many Indians who has seen this one sequence live on TV may not have felt differently from what I experienced. This event eventhough initially appreciated by many, including the commentators was soon added to the negatives in his resume.

His staring at the opposition batsmen were at times looking odd because of the frequency with which he does it. Naturally when someone becomes famous, along with it the number of foes will increase. It seems like people who wanted to see his downfall was plotting a scheme and Sree helped them by creating new antics in the cricket field. I was surprised to see, when his home cricket association was also aiding his downfall and many press conferences were held just to tarnish his image. Felt pity for this guy, for he does not seem to have a godfather for making a comeback to his team and the plot against him seemed to intensify.

The inaugural IPL was seen as a boon for him and eventhough he was the second highest wicket taker, no body was seen appreciating him, because the Harbajan slap episode got the limelight more than his performance. It was real pity to see other people's contribution highlighted, who did not even do what Sree did with the ball in his hand.

Sree did not take part in most of the games of the second IPL because of an injury. Still he was one of the most discussed topic as is evident from the comment's section of fakeiplplayer's blog. People were busy in abusing him, making all sorts of negative comments and the interesting thing was that no one, even from Kerala was seen supporting him. Is it a matter of jealousy, or is it a matter of joining with the mass opinion, or does he really deserved to get all these negative appreciation.

Soon his coverage in press also was limited to only his antics and not about his performance. When he was selected for an English club and took wickets, the main news which figured was about the great Allan Donald's comment on Sree's emotional outbursts.

In the Renji Trophy matches which followed suit he did not make any notable performance in terms of wickets and so his entry back to Indian cricket team was not expected by many.

But agains all odds, he was selected to the National team for doing duty against the touring Lankans. He was not included in the first test and seeing the batting friendly conditions, it seemed that all bowlers love to be the twelth man rather than in the playing eleven. It even seemed like he will be given a chance in these dead pitches which is highly batting friendly, where no fast bowler is expected to take wickets, and based on his performance he could be ousted from the team permananently. So when he was inducted in the playing eleven for the second test no expectations where raised. But he bowled tremendously well and in good control. He bowled some beautiful deliveries which did not get him a wicket, but he was fortunate to get wickets in not so good deliveries. His performance resulted in turning the match in India's favour. As a cricket enthusiast I could not control my emotions when I was watching the highlights of this game and see this guy perform the way no one expected him to do.

He has a long way to go, if he does not get carried away by the recent success and by being careful for evading the plots by the foes around him.

Overall he is a good product, but the longevity is depended on the way he manages himself.

Sunday, November 29, 2009

Slate reincarnated - A reliable gadget

Product: Slate
Year & month of purchase: 2006 May

A slate is something which in olden golden days is the device using which we started our writing lessons. The advantage was its reusability, since we could erase what is written reuse it. But now a days it is no longer seen because of lot of disadvantages. But neverthless, it was a good starting point.

The modern avatars appeared in the form of toy and I happened to acquire one for my little one in 2006, but never thought that it will be one of his favourite toys.


The toy consists of a white writing slate and a pen attached to it with a string.

Just write on the slate with the pen.


Slide the lever at the bottom to the right side.


The slate is now cleanly erased and ready for next round of scribbling.

No dust, no need of chalks which posed the threat of being swallowed by the kid and no irritating sound of writing using a chalk.

The kids creativity is unleashed by creating different patterns and they just enjoy using this.

The reliability of this toy is beyond doubt when you can see that I took a pic of this toy in Oct 2009, a good 3 years after its purchase. Now my 6 year old and 2 year old is enjoying using this real rugged and built to last toy.

Monday, November 23, 2009

An offroader Toy - A rugged jeep

Product Name: Offroader Jeep
Age group: 04 and up

Before I say anything about this, just have a look at this jeep.


It is a looker.

This toy is simple in the sense that it does not have any electric gizmos attached to it. No batteries, no motor, no lights, but it is rugged.


The wheel is connected to some kind of mechanical assembly due to which when it rolls, it gives a real life sound.


This toy can be used outdoors and it is sure to withstand any abuse.

Just watch these snaps to see some real life stunts using this toy, which I captured when my kid was playing.

Ready to fly after hitting a bump


Up it goes.


somehow it balanced


Now ready to land after the acrobatic session


To be frank I enjoyed watching my kid play with this jeep which is quite big standing tall at 1 feet height.

Sunday, November 8, 2009

Duckback - A true Rain coat

Product: Raincoat
Make: Duckback

Motorbike has been and is one of the most used commuting medium. One of the major hindrance in using this medium for regular office commuting is, during rainy days we can get completely wet. Raincoats are supposed to be the armory in our custody for combating this threat, which unfortunately does not serve its purpose completely.

Many a times after a ride wearing raincoats through heavy rains, we find that water has drained in through our neck region extending to our chest and also through your hand to the sleeves of the shirt. The rain pants also ensures that adequate water has logged into the top area of your pants, making the whole day of yours at office quite uncomfortable.

If you too have faced such an experience then please do read on rest of this review.

One of my friends recommended me to buy a "DuckBack" raincoat and commented that it is the best available in the market eventhough slightly highly priced. I purchased one taking into account his word from Chellam Umbrella Mart in (Thiruvananthapuram, Kerala) . Purchase price was Rs. 750. Slightly high when you consider that you can get other raincoats for as low as Rs. 300.


Still I decided to give it try. The raincoat set consisting of a jacket and pants comes in a very small packet. It can be squeesed into as little space as possible. The packet also is a water resistant one.


After the first usage itself, I found out that this one is perfect. The advantages I found are.

1. Not a single drop of water leaked into my dress after a ride of 10km continuously in heavy rains.

2. There is fastener at the end of the hand sleeve near the palm which can be tightened. This ensures that no water will enter through that opening.


3. The fastener in the neck is adequate to ensure that the water drain through the neck area is also blocked.
4. The material used is very light.
5. The water resistant bag provided can be used for storing the rain coat after usage. This bag can be confidently carried along with your office bag with full assurance that water in the raincoat will not drain out through the bag. This is a boon as earlier I used to carry plastic covers for carrying the water logged raincoats which does not look quite good.
6. It has Longer life than other local raincoats. I have been using it since Jan 2008 and so far it is serving its purpose just like when it was used in day 1.
7. The pockets provided are also rainproof. The flap on top of the pocket ensures that no water leaks through the pocket's opening.


The riding jacket which I use for long distance tours which contains body protection paddings is not quite water resistant, as a result of which now a days I wear this raincoat on top of the riding jacket when it rains.

This rain jacket cannot be used as a substitute for a riding jacket as wearing this during sunny days is sure to make you really wet because of sweating. Also there is no protective padding. Use it only for its intended purpose - ie protection from getting wet during rains - which it does wonderfully well.

Quiet a good product. I have using it for protecting myself from rain during the trips listed here. Click here to view my trips on Royal Enfield Motorcycle

Sunday, November 1, 2009

Home Loan - A fact file

A General review based on my experience in availing a home loan.

Dreaming about a house !!!!

Well we all are sure to dream about it at some point of life.


But how to make moolah or the money. Most people, if not all depends on Bank loans for constructing a house. I am no expert in analysing or evaluating the existing housing loan schemes from various banks, But I can very well share my considerations based on the loans which I have taken and the sequence of events leading to taking a bank loan.

Right from the moment we decided to buy land and construct house, we were in search of a loan , since we needed loan for purchasing the land as well and only based on the loan amount eligible we were able to fix a budget.

The question which I asked the banks and the conclusions based on the answers arrived at were the following.

  1. What will be the Equated Monthly installment (EMI) per lakh for a period of 20 years / 10 years / 5 years.
  2. How much loan amount am I eligible for based on my monthly income?
  3. How much loan amount will I get based on the estimate of the house which I am going to buy?
  4. Can I get a loan for the land before purchasing a house?
  5. When will I get the loan amount for the land purchase?
  6. Is there any stipulated time before which I should finish my construction once I avail the land purchase component of the loan?
  7. When should I start repaying my loan? or when should I start paying my EMI?
  8. What will be the initial processing charge for the loan availed?
  9. Is there any penalty for premature closure of the loan? If yes what's the rate?
  10. What are the documents needed by the bank for sanctioning the loan and how much time it will take?

Also please note that I got all these answers as emails or in writing so that I have an quantitative and authoritative answer rather than an aribitrary answer from some marketing guy of the bank.

1. What will be the Equated Monthly installment (EMI) per lakh for a period of 20 years / 10 years / 5 years.

Eventhough there are many EMI calculator websites around, I found out the actual rates vary based on some calculation methods.
EMI shall be calculated based on the fixed interest rates and also based on the floating rates for all the tenures mentioned here. The interesting thing is that the emi varied from bank to bank eventhough they quoted the same interest rate. So this step is a must. Also you can decide what is the tenure that you have to opt.

2. How much loan amount am I eligible for based on my monthly income?
Found out that this varies from bank to bank. They also take into consideration whether you are a government employee or a private sector employee.

3. How much loan amount will I get based on the estimate of the house which I am going to buy?
This figure also varies from bank to bank. Banks quoted in the range of 80 to 90%. Some banks offered full amount also, but for that I have to increase the estimate by including the estimate for furniture, gardening etc.
Answer to questions 1, 2 and 3 will help you to arrive at the budget that you can fix for the purchase/constrution.


4. Can I get a loan for the land before purchasing a house?
Yes almost all banks includes value of land also. But the amount sanctioned for land purchase depends on the amount which we show in the records during transactions. Usually people show only less amount in the records just to evade from the land registration tax. In some cases the land seller itself tells to show only less money in the records so that he can evade from paying tax on the profit earned by him in selling the land. This might be a factor to consider while buying the land. Tell the land seller in advance that you may have to put either the actual amount of the purchase before finalising on the deal and paying the advance for the land.

5. When will I get the loan amount for the land purchase?
Getting an answer to this is important as some people need to get the loan amount for completing the land deal. Many banks issue the cheque in the name of the seller, before we complete the land deal. The banks might require the duplicates of land documents well in advance. We have to submit the originals of the land documents immediately after the deal.

6. Is there any stipulated time before which I should finish my construction once I avail the land purchase component of the loan?
Yes, Once the deal on the land is done using the loan from bank, there will be a minimum period of time before which we should complete the construction. Usually this ranges from 2 years to 3 years.


7. When should I start repaying my loan? or when should I start paying my EMI?
This is a very very important question as this can save you a lot of money. There are 2 options available
Option 1. Some banks ask you to pay the Pre EMI. That is you have to pay the interest on the amount which has been sanctioned to you. Usually banks allot amounts in different stages like, during land purchase, before start of basement, after finisihng first floor, after finishing second floor and then final disbursement. After each amount is availed we have to pay the interest for the said amount each month. This interest will not be counted upon when we start to pay the EMI after final disbursement. So if your construction is delayed you end paying Pre Emi for months.
Option 2. Some banks offer you that you can start repaying the EMI of the loan right after the first disbursement. If this option is available, it is the best, because then you are starting to repay your loan irrespective of there is a delay in construction or not.
In the case of private banks, if you keep on asking for option 2, before taking the loan, they might give it. So ask for it.


8. What will be the initial processing charge for the loan availed?
This also varies hugely between banks. Some banks even offer zero processing charges. Some cases it can go upto to 1%.


9. Is there any penalty for premature closure of the loan? If yes what's the rate?
For some banks yes and for some banks no. In some cases it varies from customer to customer. Most of the people don't ask about this while going to take a loan, hence the bank will remain silent about this and when the customer comes to prematurely close the loan, bank will ask for 2% of the remaining loan amount, which can be a huge sume. Now why should we plan for prematurely close a loan, when we know that we won't be able to raise this much sum during the next 10 to 20 years. This need can come for anybody.
Usually some banks comes up with offer for taking up existing housing loans at a much reduced interest rates. In such cases we can close the loan of the existing bank by availing loan from the new bank which has come with the offer. Then our existing bank will tell us to pay 2% more than what need to be repayed.
So try to bargain with the bank before taking the loan itself, and get a 0% premature closing offer. This is something we can get by asking. So ask ask and ask.


10. What are the documents needed by the bank for sanctioning the loan and how much time it will take?
The documents needed by bank will stated clearly in some of the instructions given by the bank. But the major thing is that how much time will be taken by the banks to verify these by the banks before sanctioning the loan.
Quite obviously private banks does this pretty quickly (1week to 1 month), but nationalized banks just eats up loads of your time (1 month to 6 months or more). So take this time into consideration and approach the banks quite early.
For getting an answer to this question, try to approach atleast one of the recent customer of the concerned bank and get feedback from him. In some cases some of the documents required by the bank will be very hard to get. So be well informed about the related documents and how to get it before finalising the decision.


Once you get an answer to the above questions, you will understand that there are lot of differences in the approach of private banks and nationalised banks. Some of the their advantages and disadvantages based on my experience are given below


Advantage of private banks

1. Very very customer friendly
2. Ready to wait till late in night to talk with us (saves us from taking off during office hours, I benifitted a lot because of this)
3. Documents needed are easy to get.
4. No need to run around after submitting the documents
5. Gets answer to all our doubts very promptly
6. Loan disbursement process is very smooth


Disadvantage of private banks
1. Generally rates and charges will be high. (this will not be clearly evident, but once you get answer to all the queries which I posted above, do a simple work out and this will be evident)
2. Default penalties will be more.
3. Tends to hide some of the hidden costs involved. Will get those information only after repeated prompting. Also will try to make us feel that such costs are highly unimportant.


Advantages of nationalized banks
1. All operations will be transparent.
2. All rates and information will be provided.
3. Generally rates will be low, eventhough not quite evident.


Disadvantages of nationalized banks
1. Very customer unfriendly. (One of the SBI branch manager here in my state was trying to scare away from taking a loan citing the difficulties involved)
2. Verification process is quite cumbersome. (We may have to run around for getting some documentation straight)

Ask for information. note it down, be very well informed and then decide.

You will not go wrong.


Thursday, October 29, 2009

Side box/s for Royal Enfield Bullet

Product: Sideboxes for Royal enfield bullet
Make: Custom
Material: MS (Mild Steel) with chrome coating


Would you believe that I searched for this one accessory for about 1 year and after that took another 7 to 8 months to realise this.

My requirement for sideboxes (Panniers) were
  1. Want to keep the daily luggage (tiffin box + one bottle), rain coat, tools + some grocery
  2. Needed it on both sides, just for that symmetrical look
  3. It should look part of the original equipment and not an add on accessory
  4. Should not protrude too much away from the body of the vehicle
  5. Ladies wearing sarees should be able to sit with both legs in one side even after fitting this box.
  6. The pillion riders thighs should not rest in this sidebox, coz this will start to cause pain in thighs after about 5 mins ride
  7. It should not hinder my leg's travel path while getting in or out of the bull

I searched the net, checked with local accessory shop, and wherever possible to find one meeting the above criteria. There were some beautiful ones from Studds. Was tempted to buy that. But once fitted, it will not satisfy requirement 4, 5, 6 and 7.

Had almost dropped the idea, when a friend of mine suggested to try for a custom build and introduced me to a guy who had already done such jobs. He immediately enlightened me with the reasons for ready made ones not meeting my criteria.


The "Stay rod" (see above figure) which supports the rear mudguard is curved outwards. So the side box can be fitted only outside this stay rod, resulting in it protruding too much away from the body.

Solution - bent the stay rod inwards.

Even after this, the gas shocks (shown in figure) will come in way of the box.

Solution - Bent the inside of the box to accomodate the gas shocks.

I was impressed with the way he explained the things and the card board model which he cut and showed me. So placed a work order immediately.

After that started my long ordeal. This guy had lot of commitments including alterations amounting to lakhs of rupees, which made my rather low value order being put to the back stage. Finally after much follow up, the box was ready after 8 months.


Now see the output of this effort.

The right side box
Since part of the box goes underneath the back seat, the opening was made side on. The doors were made bigger, just to ensure that there is ample opening for things to go in.

The left side box
The saree guard on the left side was removed. Now this box itself serves as a saree guard. I bought another pair of stay rod and kept the original as spare, in case I want to go back to the original state.

The view from the back. One will not notice that there is a box unless he is quite watchfull.

The doors were plated just to match the chrome of the tank. The shape of the door also had a resemblance with the petrol tank's shape. These minute details ensured that all the requirements specified by me was met.


Does this look aftermarket?


Total cost: Rs. 4000 (INR) approx for two boxes

In use for the last 18 months, Went for some long distance trips too, only one back pack was needed in

additional to the space offered by these two boxes. Click here to view pics / log of one of such trips here

Let me know whether this review was useful to you by way of comments

Friday, October 16, 2009

SnapIt - An easy to use Screen Capture Software

Product: SnapIT, A screen capturing tool for Windows.

SnapIt, an innovative name and an equally useful software. This review is based on my 7 day experience in using SnapIt, during which time I was quite happy with the user friendliness and usefullness of this software.

How many times do you press the print screen button, for creating images to be inserted into a report?
If the answer is zero,then this product is not for you.
If the answer is not zero, then definitely try this software.

Normally, after every screen capture, we have to open an imaging software, paste whatever we have copied to clipboard, save it as a file in a folder so that we can use this file later.
In some cases while preparing user manual kind of a document, we have to keep on taking screen shots. After each screen shots are taken, we spend a good amout of time in making it a JPG file using an imaging software. This time can be saved a lot by using this software.

Things I liked in SnapIt
  • After screen capture using normal printscreen, I can select the area of screen which needs to be copied. Specify the file name and save it without the help of an imaging software
  • Auto save mode for saving multiple screen captures. In this mode I have to specify the folder where images are to be saved. Also specify a filename. Once in automode, after every Print Screen and area selection the file will be saved in the specified folder with the file name previously specified combined with a count.

Anyone can try this for free since this has a 14 day trial period during which time we can decided whether we need it or not.

How to download and install?

1. Go to http://www.digeus.com/downloads/snapit/index.html

2. Click Download. Save the install file (1.2MB) to your PC.


3. Double click the installation file and follow the instructions.

4. Once installed run the SnapIt program. This camera like icon will appear in the system Tray.

5. Press Print screen button. The mouse icon changes to a select mode. Select an area for saving.

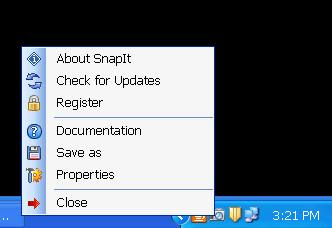
6. Right click the SnapIt icon. A pop up window appears
7. Click save as, Select folder and file name.

Thatz it, the image is saved.

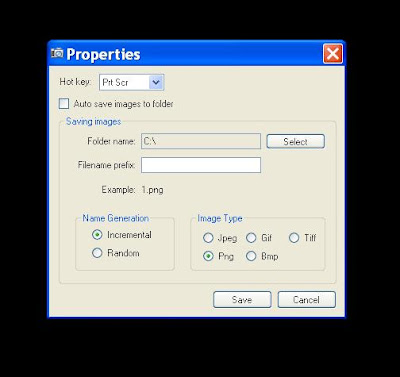
For enabling Auto save Click "Properties" from the Popup menu specified in Step 6.

This window will appear

Select auto save and specify the folder and file name.

Once this option is enabled, just keep on pressing print screen and select the area to be saved. The image will be automatically saved.

Sure to save loads of time for the User manual creators, for creating screen shots for presentations etc. All the screen shots of this write up has been created by SnapIt.

If you feel this product is useful, you can purchase it by clicking the "Register" option from the Pop up menu. This screen will appear.

Click Order now and it will lead to the product website. Cost of this software is $17, which is only a low price to pay for the loads of time you save.

An UNCOMPLICATED product with a very simple User Interface. Really worth a try.

Monday, October 12, 2009

Goldstar Silencer for Royal Enfield Bullet

Product: Goldie aka Goldstar Silencer for Royal Enfield Bullet.

A thumping solution for the poor souls who miss the thump!!

The AVL's or the aluminium engine bullets has quenched the thirst of lot of bullet crazy boys. Many first timers of Royal enfield enthusiasts prefer to go for this model because of the normal positioning of the gear/ brake lever, its reliability and higher cruising speed. But the price they have to pay is the lack of thump which only a traditional bullet having cast iron core gives.
I too was someone who was worried about this. But then my friends in the riding club offered a solution.
A GOLDSTAR silencer. (The name of which is derived from the old timer BSA Goldstar)

My machismo had come with a long bottle silencer as shown in this picture.


To satisfy some emission norms there are some barriers inside this long bottle silencer which will let the air out in a zig zag manner only, resulting in dampened sound, due to which the engine noise is more audible than the regular thump of the bullet.


The goldstar silencer or the Goldie does not have any baffles inside it and the unique shape of the silencer ensures adequate back pressure and once fitted the difference is really amazing.
There is no need to replace the bent pipe.

My bull with the Goldie.


Once Goldie is fitted the changes I experienced are

  • Feeling of a sense of freedom
  • I'm revving up further automatically & I'm feeling more power
  • The thump definitely has gone up. If driven sedately then sound is very less.
  • The most significant note which I liked was the thump while revving up from a constant speed
  • Earlier while driving I felt that the engine is tooo light. That feeling is now gone away.....

GOLDIE REALLY ROCKSS......!!!

Purchase price: 2K

Place: Bangalore


Note: With Goldie one could get a sound like thump, only a standard bullet can give out the thumping sound


Saturday, October 10, 2009

Toy Guitar - Quite realistic !!

Product Name: Guitar
Age group: 04 and up

Just one look at this beautiful product and you are sure to fall in love with this one.


Color combination of the toy is something which is an important ingredient to make the toy attractive and this one is sure to attract kids if not the so called adults.
The sound output matches with that of the guitar so much so that at times it feels as if someone is playing the real one.


The four buttons on the handle is used to play the sound.


The round lever on the main body can be used to give special effects to the sound. Just watch the right hand of my son.

The four switches in the main body is for switching on and off and to give select the background tones. There are volume control buttons on the main body.


Any kid will easily get accustomed to its usage.

The good thing is that when a kid plays this, the sound of music coming out is enjoyable to people around, otherwise it will be a nuisance for others when a kid plays this. The kids also enjoys the music, making them use this again and again.

This toy works on battery with auto power cut off when not in use. There are no sharp edges and is built to tolerate abuse to a certain level.

Wednesday, September 2, 2009

Dragster - A simple drag race

Product Name: Dragster
Age group: 04 and up
No of players: 2

Dragster - as the name suggests is similar to drag racing. The contest element adds to the fun. Children will find it interesting to play even with their parents. The more you play the more tricks we will master to win. It is quite surprising to see how even a small child uses different techniques to win as he gains more experience.
Package contents:
  1. A racing base
  2. Eight small plastic racing car models, 4 of them in red and 4 of them in blue
  3. Two marbles

The set up has to be arranged as shown below to start the game.


The marbles are place against a small rubber launch pad. The marble can be launched by using the thump as shown below
Once the marble is launched it will go and hit any one of the cars in that side and will drag it till it hits the wall in the end of the track.
Objective of the game is to make all the car drag to its finishing point by hitting it with marbles. Varying pressures has to be applied using the thump to ensure that the marble correctly hits the cars in each lane.
Children might find it difficult to finish the game initially, especially the last car. This is because, they tend to apply the same pressure for releasing the marbles, but believe me, they would soon learn the trick and will be able to decide which car will go first by adjusting the release pressure of marbles.


A simple toy, but really innovative concept which can sustain the interest of the kid.
Only sore point being the use of really small parts and the usage of marbles which is quite heavy and if thrown at somebody can really hurt.


Hence parental guidance is adviced especially if only small kids are playing.

Wednesday, August 26, 2009

Laptop for Kids

Product: Laptop for Kids
Age: 4 and above (might be interesting for smaller ones also, but full potential can be realised by this age group)
Features: Informative and educational, similarity to its original counterpart

The more the options in the toy, the more it will be put to use by the kid. The exploring nature of kids is well utilized by some toys by way of creating lot of options worth exploration for a kid. This laptop is one such toy which has a good educational value. This laptop is very much similar to its real counterpart.

It contains a main unit and a mouse
The opening action is quite similar to any other laptops. The press switch is very simple to operate. Once opened also you will see quite a resemeblance to the other laptops
Now have a close up view of the display.Only the centre portion of the display is the area where display is updated. It is a black and white display only. The other portions contains stickers which contians the option numbers to be typed for getting to that screen. From the screen you can see that there are 36 different options grouped under four major titles viz Vocabulary/Grammar, Mathematics, Music/Drawing and Games.
Selection of these options by the usage of the keyboard.
From the picture we can see that it is a "QWERTY" keyboard. So once kids are used to this they get quite familiar with the normal computer keyboards.

The vocabulary/grammar and Mathematics section contains questions related to basic English vocabulary/grammar and fundamental maths only. To make the question and answering interesting, images are shown and if the answers are right there is a good audible word of encouragement followed by a round of applause which the kids will appreciate. Also while doing this the keyboard familiarity automatically increases. We can see what is covered in each of these topics in the close up view of the display above.
The music/drawing and games section also contians some interesting things which are of interest to the kids.
Once the kid understands the basic operations leave the kid alone with the laptop. Never try to teach him how to play/use, after selecting each of the options. Let him explore and find out how to play. If he cannot play or use any of the screen let it be like that, coz if you are not helping, then you can see that he will try to learn it as he grows up a little bit more bigger. That means the interest can be sustained a little bit longer.
No guidance means, the explorative nature of kid is not hampered with. Otherwise after selecting each option they will come to the parents and ask them how to play. In this case the kid will soon lose interest in this.
See this laptop in action.

Pros
  • A whole range of options
  • QWERTY key board
  • Educational value
  • Proximity to its original counterpartBattery life

Cons

  • Not so rugged
  • Display is not colorful
The wide range of options in this educational toy is sure to sustain its interest for a prolonged period provided parental intervention and support is minimal.
Related Posts Plugin for WordPress, Blogger...